Gluten-Free Bread: Baking Guide from Scratch
For many individuals with celiac disease or gluten sensitivity, finding a delicious and satisfying loaf of bread can be a challenge. Traditional breads made with wheat flour are off-limits, leading many to seek gluten free alternatives that often lack flavor, texture, and that beloved crusty exterior.
For many individuals with celiac disease or gluten sensitivity, finding a delicious and satisfying loaf of bread can be a challenge. Traditional breads made with wheat flour are off-limits, leading many to seek gluten free alternatives that often lack flavor, texture, and that beloved crusty exterior. However, with a little knowledge, practice, and the right techniques, you can create gluten free bread from scratch that rivals its gluten-rich counterparts.
Understanding Gluten
What is Gluten?
Gluten is a group of proteins found in wheat and related grains such as barley, rye, and triticale. It is responsible for the elasticity and chewy texture that are characteristic of bread and other baked goods. Gluten acts as a binder, helping the dough retain its shape and rise during baking.
Gluten Sensitivity and Celiac Disease
For some individuals, gluten can cause adverse reactions. Celiac disease is an autoimmune disorder where the ingestion of gluten leads to damage in the small intestine. Symptoms of celiac disease can include digestive issues, fatigue, and skin problems. Gluten sensitivity, on the other hand, refers to a condition where individuals experience non-autoimmune reactions to gluten, which can also affect their quality of life.
For those who cannot consume gluten, a strict gluten free diet is essential. This means avoiding all foods containing wheat, barley, rye, and any derivatives from these grains. However, the good news is that a wide range of gluten free grains and ingredients are available for baking delicious bread.
Essential Ingredients for Gluten Free Bread
Creating gluten free bread requires an understanding of which ingredients to use. Here are some of the most important ones:
Gluten Free Flours
Brown Rice Flour: A common base for many gluten free bread recipes, brown rice flour provides a mild flavor and good texture.
Almond Flour: Made from finely ground almonds, almond flour adds richness and moisture but can make the bread denser.
Tapioca Flour: Also known as tapioca starch, this flour helps create a chewy texture and improves the elasticity of the dough.
Sorghum Flour: High in protein and fiber, sorghum flour contributes to a lighter texture and slightly sweet flavor.
Potato Starch: Potato starch adds moisture and helps improve the overall texture of gluten free bread.
Oat Flour: Made from ground oats, oat flour can add a subtle sweetness and is high in fiber; ensure it is labeled gluten free to avoid cross-contamination.
Chickpea Flour: This flour adds protein and a slight nuttiness to bread recipes, making it a nutritious option.
Binding Agents
Since gluten is responsible for binding and structure in traditional bread, gluten free recipes often require substitutes. Common binding agents include:
Xanthan Gum: A popular ingredient in gluten free baking, xanthan gum mimics the elasticity of gluten and helps hold the bread together. Typically, 1 teaspoon per cup of flour is recommended.
Guar Gum: Similar to xanthan gum, guar gum serves as a binder and thickener in gluten free recipes.
Psyllium Husk Powder: This soluble fiber helps retain moisture and improve the texture of gluten free bread, resulting in a more satisfying loaf.
Leavening Agents
Leavening agents are crucial for helping gluten free bread rise. Typically, you will need either:
Baking Powder: A combination of an acid and a base, baking powder provides a quick rise in the dough.
Baking Soda: Often used in conjunction with an acid (like vinegar or lemon juice), baking soda can also help with leavening.
Other Ingredients
Liquid Ingredients: Most gluten free bread recipes will require a liquid component, such as water, milk (dairy or non-dairy), or yogurt. These liquids help hydrate the flour and activate the leavening agents.
Sweeteners: Depending on the recipe, you may want to add a sweetener like honey, maple syrup, or sugar to enhance flavor.
Fat: Ingredients such as olive oil, melted coconut oil, or butter can add moisture and richness to gluten free bread.
Basic Techniques for Gluten Free Bread Baking
1. Measure Ingredients Accurately
Precision is crucial in gluten free baking. Use a kitchen scale for the best results, and be sure to spoon flour into the measuring cup and level it off for accuracy.
2. Creaming Method
For enriched gluten free bread, the creaming method can be employed. This involves beating soft butter with sugar until light and fluffy before adding other ingredients. This technique helps aerate the dough.
3. The Right Mixing Technique
Gluten free doughs differ from traditional doughs in that they do not require kneading. Instead, mix the ingredients until just combined. Overmixing can lead to denser bread.
4. Allow for Resting Time
Many gluten free bread recipes benefit from resting time after mixing. This allows the flour to fully hydrate and helps improve the overall texture.
5. Use Proper Baking Equipment
Invest in quality baking pans, ideally made of metal or glass, as these conduct heat well. A loaf pan with straight sides is ideal for bread baking, as it helps the bread rise evenly.
6. Monitor Baking Time
Gluten free bread may take longer to bake than traditional bread. Keep an eye on your bread, and test for doneness with a toothpick inserted into the center—if it comes out clean, the bread is ready.
A Simple Gluten Free Bread Recipe
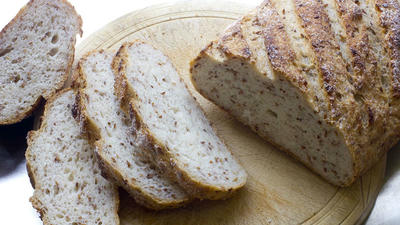
Now that we have explored the essential ingredients and techniques for gluten free bread baking, let’s dive into a simple recipe for a classic gluten free bread.
Ingredients
- 2 cups brown rice flour
- 1 cup tapioca flour
- 1 cup potato starch
- 1 teaspoon salt
- 1 tablespoon sugar
- 2 teaspoons xanthan gum
- 1 tablespoon baking powder
- 1 3/4 cups warm water (about 110°F)
- 2 tablespoons olive oil
- 1 tablespoon apple cider vinegar
- 3 large eggs
Instructions
Step 1: Prepare the Oven and Pan
Preheat your oven to 375°F (190°C). Grease a standard 9x5-inch loaf pan or line it with parchment paper for easy removal.
Step 2: Combine Dry Ingredients
In a large mixing bowl, whisk together the brown rice flour, tapioca flour, potato starch, salt, sugar, xanthan gum, and baking powder until well combined.
Step 3: Combine Wet Ingredients
In a separate bowl, whisk together the warm water, olive oil, apple cider vinegar, and eggs until smooth.
Step 4: Mix Wet and Dry Ingredients
Pour the wet mixture into the dry ingredients, and mix until well combined. The dough will be thick and sticky.
Step 5: Rest the Dough
Allow the dough to rest in the bowl for 20-30 minutes. This resting period will help improve the texture of the bread.
Step 6: Transfer to Loaf Pan
Scoop the dough into the prepared loaf pan, smoothing the top with a spatula.
Step 7: Bake the Bread
Bake in the preheated oven for 45-50 minutes, or until the bread is golden brown and a toothpick inserted into the center comes out clean.
Step 8: Cool
Remove from the oven and let the bread cool in the pan for about 10 minutes. Then, transfer it to a wire rack to cool completely before slicing.
Storing Gluten Free Bread
Once your gluten free bread has cooled, store it properly to maintain its freshness:
Room Temperature: Keep sliced bread in an airtight container or resealable bag. Consume within 3-5 days.
Freezing: For longer storage, wrap the loaf tightly in plastic wrap and then in aluminum foil before placing it in the freezer. Thaw at room temperature or toast slices directly from the freezer.
Creative Variations on Gluten Free Bread
Once you have mastered the basic recipe, consider experimenting with creative variations:
Herb and Garlic Bread
Add 1 tablespoon of dried Italian herbs and 2-3 cloves of minced garlic to the dough for a flavorful twist.
Cinnamon Raisin Bread
Fold in 1 tablespoon of cinnamon and 1 cup of raisins or chopped dried fruit for a sweet breakfast treat.
Seeded Bread
Add seeds such as sunflower, sesame, or chia to the dough for added texture and nutrition.
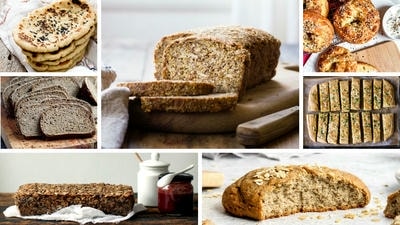
Multigrain Blend
Experiment with gluten free whole grain flours like sorghum or millet to create a hearty multigrain bread.
Troubleshooting Common Issues
Dense Texture
If your gluten free bread turns out dense, it may be due to:
Not enough liquid: Experiment with adjusting the liquid ratio.
Overmixing the dough: Mix until just combined to avoid creating a dense loaf.
Uneven Rise
Uneven rising can occur if the ingredients are not mixed uniformly. Ensure thorough mixing and allow time for the dough to rest before baking.
Gummy Crust
A gummy crust may result from insufficient baking time or using ingredients that contain excess moisture. Ensure proper measurements and baking times are followed.
Nutritional Considerations
While gluten free bread can be an excellent alternative for those with dietary needs, it’s important to consider its nutritional profile. Gluten free breads vary widely in nutrients based on the ingredients used:
Whole Grains: Opt for whole grain flours where possible to increase fiber intake.
High in Protein: Incorporate protein-rich ingredients such as nuts, seeds, or beans when making bread.
Monitor Additives: Some store-bought gluten free breads contain additives and preservatives; always read the labels.
The Rise of Gluten Free Bread in Society
The gluten free movement has gained tremendous momentum in recent years, with numerous bakeries and food manufacturers offering gluten free options. This shift reflects a broader awareness of dietary needs and increased freedom for individuals with gluten sensitivities.
Homemade vs. Store-Bought
While gluten free bread can be found at grocery stores, many individuals find that homemade options offer superior flavor and texture. Additionally, making bread at home allows for full control over ingredients and prevents cross-contamination for those with severe allergies.
Conclusion
Baking gluten free bread from scratch can seem daunting at first, but with the right knowledge, ingredients, and techniques, it can be an enjoyable and satisfying culinary adventure. This guide provides everything you need to start baking gluten free bread that is not only delicious but also accommodates various dietary needs.
With practice, you can master the art of gluten free baking, creating a variety of breads that suit your tastes and preferences. As you explore the world of gluten free ingredients and recipes, you’ll discover that delicious bread is within reach for everyone, regardless of dietary restrictions. Embrace the challenge, experiment with flavors, and enjoy the wonderful world of gluten free bread baking.